Whether you’re mounting a new TV, hanging shelves, or embarking on a home renovation project, knowing how to find studs in wall is a fundamental skill. This seemingly simple task is crucial for the structural integrity of your installations, ensuring they’re securely anchored. The importance of locating a wall stud cannot be overstated, as it provides the support needed for heavy objects, thereby preventing damage to your walls and ensuring safety within your home.
This article will guide readers through various methods to find a wall stud, from using a stud finder to employing DIY techniques that do not require specialized tools. Additionally, it will cover how to locate studs in different types of walls, which can vary significantly in materials and construction, challenging the one-size-fits-all approach. Safety tips and precautions will also be discussed to ensure that readers can carry out their projects with confidence and security. By the end of this guide, you’ll be equipped with the knowledge to successfully find studs in any wall, supporting a wide range of home improvement projects.
What is a Wall Stud?
Wall studs are vertical structural elements that form the framework of walls in most buildings. They are typically made from wood or metal and are essential for maintaining the structural integrity of a building. Wall studs serve multiple critical functions beyond just supporting the wall surface. They are the backbone on which the wall is constructed, providing a sturdy and stable foundation for the entire structure.
Understanding Wall Studs
- Composition and Construction: Wall studs are most commonly made from wood or metal, with wood being preferred for its affordability and ease of handling. Standard dimensions for wooden studs are typically 2×4 or 2×6 inches, which refers to their width and depth. Metal studs, often made from steel or aluminum, offer advantages like fire resistance and consistent dimensions.
- Role in Building Construction: The primary role of wall studs is to support the vertical load of a building, transferring weight down to the foundation. This is crucial in multi-story buildings where the loads accumulate vertically. Additionally, studs provide a framework for insulation, electrical wiring, and plumbing.
- Design and Spacing: The spacing between studs, commonly 16 or 24 inches on center, is designed to align with standard sizes of construction materials like drywall and plywood. This spacing helps in evenly distributing loads and providing a secure base for attaching wall finishes.
- Functional Flexibility: Besides structural support, studs play a significant role in dividing interior spaces into rooms and corridors, allowing for customizable floor plans. They also enable the attachment of both interior and exterior finishes such as drywall, plaster, and siding, enhancing the building’s aesthetic and functional attributes.
- Enhanced Features: In some constructions, double-studded walls with an air gap are used to improve sound insulation, which is beneficial in commercial spaces and residential buildings where noise reduction is desired.
Wall studs are indispensable components in construction, providing not only the skeletal framework of buildings but also facilitating essential services and enhancements that contribute to the building’s functionality and safety. Their design and implementation in a building’s architecture allow for a stable structure that meets various operational and aesthetic needs.

Why You Need to Find a Wall Stud
Finding a wall stud is essential for safely and securely hanging items on your walls, particularly when dealing with heavy or valuable objects. Wall studs provide the necessary support that drywall alone cannot offer. Here are the key reasons and scenarios that highlight the importance of locating studs in your walls:
Secure Attachment for Heavy Items
Wall studs are the vertical framing members within a wall, typically made of wood or metal, that provide robust support. Hanging heavy items such as large mirrors, shelves laden with books, or flat-screen TVs requires anchoring them to these studs. This ensures the weight is adequately supported and prevents the items from detaching and causing damage or injury.
Preventing Wall Damage
Attaching heavy objects directly to drywall without anchoring them to studs can lead to significant wall damage. Drywall is not designed to support substantial weight on its own. Over time, the weight of a hanging object can cause the drywall to tear or crumble, leading to costly repairs. By locating and using wall studs, you distribute the load across a more substantial part of the wall structure, mitigating any potential damage.
Enhanced Safety
Securing heavy items to wall studs not only protects the wall but also enhances safety within the home or building. Objects that are not properly secured can fall, posing a risk to anyone, especially children and pets, who may be in the vicinity. Properly installed items on wall studs remain fixed and stable, reducing the risk of accidents.
Optimal Placement of Wall Hangings
Knowing the location of wall studs allows for the optimal placement of wall hangings, ensuring they are both aesthetically pleasing and securely fastened. This is particularly important for the arrangement of multiple items or creating a gallery wall, where balance and symmetry are key.
Use of Appropriate Anchoring Methods
For lighter items, alternatives such as wall anchors or adhesive hooks might suffice, which do not require stud support. However, understanding when and where to use these alternatives comes from knowing the limitations of your wall material and the weight of the object being hung. For heavier objects, the use of more robust fastening methods directly into studs is necessary.
In summary, finding a wall stud is a crucial step in ensuring the safe, secure, and aesthetically pleasing installation of wall hangings. Whether you’re redecorating, renovating, or simply hanging a new piece of art, taking the time to locate studs can save you from potential damage and additional repair costs, while also ensuring the safety and stability of your wall-mounted items.
Using a Stud Finder
Types of Stud Finders
Stud finders are essential tools for locating the framing studs behind wall surfaces and come in two primary types: magnetic and electronic. Magnetic stud finders detect metal fasteners like screws and nails used in the stud construction. They are simple to use and cost-effective but may require some guesswork to pinpoint the exact center of the stud. On the other hand, electronic stud finders are more advanced, using sensors to detect changes in wall density. These devices can identify both wooden and metal studs and are highly accurate, making them preferable for tasks requiring precise placements.
Step-by-Step Usage Instructions
- Prepare the Stud Finder: Before starting, ensure your stud finder’s batteries are fresh for accurate readings. Clean the device’s back—the part that contacts the wall—to prevent scratches and ensure nothing obstructs the sensors.
- Calibration: Place the stud finder flat against the wall at the desired starting point, usually about one foot left of where you intend to hang or mount something. Turn on the device by pressing the power button, usually located on the side or front. Hold the device still for a few seconds to allow it to calibrate, indicated by a beep or light.
- Locating a Stud:
- Slowly slide the stud finder horizontally across the wall.
- Watch for signals like beeping or flashing lights, which indicate a stud’s edge.
- Once you detect an edge, mark it with a pencil.
- Continue moving the stud finder to locate the other edge of the stud and mark it as well.
- Verify the Stud’s Center:
- After marking the edges, use the stud finder to pinpoint the center of the stud for the most secure fastening point.
- Mark the center clearly.
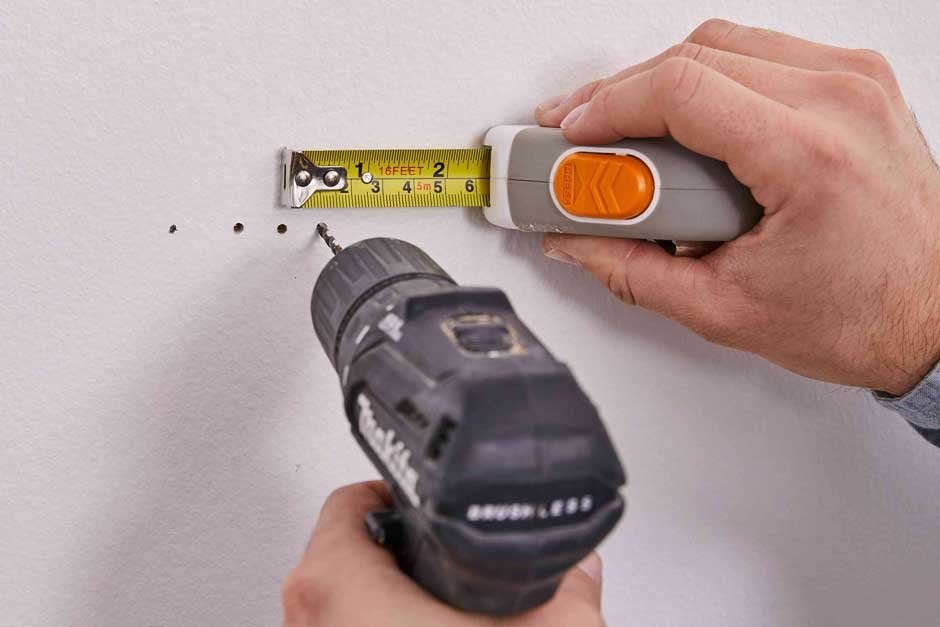
- Confirm the Findings: Double-check the stud location by using a small nail or drill to probe gently at the marked center. This method confirms the presence of a solid stud rather than other materials like pipes or wiring.
- Repeat for Additional Studs: Move the stud finder along the wall to locate additional studs, typically spaced 16 to 24 inches apart. Mark each stud as described in the steps above.
By following these steps, homeowners and DIY enthusiasts can effectively use a stud finder to locate studs behind walls, ensuring secure and safe installations of shelves, frames, or any wall-mounted fixtures.
Finding a Stud Without a Stud Finder
Tapping the Wall
One of the simplest methods to locate a stud without a stud finder is by using the tapping technique. Start by gently tapping on the wall with your fingertip or a small tool like a screwdriver handle. As you move along the wall, listen for changes in the sound. A hollow sound typically indicates the absence of a stud, whereas a more solid sound suggests you are approaching one. Once you detect a solid sound, you can measure 16 inches to either side to find adjacent studs, confirming their presence by continuing to tap and listen.
Using Electrical Outlets and Switches
Electrical outlets and switches are almost always mounted to the side of a stud. To use this to your advantage, remove the cover plate of an outlet or switch and tap gently on each side of the box. The side that produces a solid sound is likely where the stud is located. From this point, you can measure 16 inches to either side to locate additional studs, ensuring accuracy in your measurements and placements.
Using Magnets
Another effective technique involves using a strong magnet, such as a neodymium magnet. Move the magnet along the wall’s surface until it sticks—this usually happens when it finds a drywall screw or nail, which are fastened into studs. Once you find one fastener, you can place additional magnets above and below along the same line to map out the entire length of the stud. This method not only locates the center of the stud but also helps in marking its vertical path.
Looking for Dimples in Drywall
During the drywall installation, screws or nails are used to fasten the drywall to the studs, and then mudded over before painting. Over time, this can leave small, almost imperceptible dimples. By shining a flashlight at a steep angle against the wall, you can spot these dimples. Each dimple usually indicates the presence of a stud. Once you spot a dimple, measure 16 inches to either side to find additional studs, ensuring to check each spot for more dimples to confirm their locations. This method is particularly useful in older homes where the standard distance between studs might vary.
Finding a Stud in Different Wall Types
Drywall
When dealing with drywall, individuals can employ a variety of methods to locate studs. One effective approach is using a strong magnet to detect the drywall screws that are fastened into the studs. These screws are typically covered with drywall mud and paint, but a strong neodymium magnet can still catch on these fasteners, indicating the stud’s center. Additionally, if the drywall mud has created visible dimples over the fasteners, shining a flashlight across the wall may reveal these marks, further aiding in stud identification. For those who prefer technology, smartphone apps that utilize the device’s magnetometer can serve as makeshift stud finders, though this method may require careful movement along the wall for accuracy.
Plaster Walls
Plaster walls present a unique challenge due to their thickness and density, which can render standard stud finders less effective. For homes with plaster walls, using a stud finder with a deep scan feature is crucial as it can penetrate the layers of dense plaster and the lath behind it. Another traditional method involves using strong magnets to locate the metal nails used to secure the wood lath to the studs. Since these nails are attracted to magnets, moving a strong magnet across the wall slowly will help pinpoint their location and, by extension, the underlying studs. Additionally, tapping on the wall and listening for a change in sound can help distinguish the more solid areas where studs are likely located, although this method requires a careful ear.
Wood Paneling
Finding studs behind wood paneling can often be managed without sophisticated tools. One practical approach is to look for visible nails or screws that typically indicate a stud’s location. Applying pressure along the wall can also help; areas with little to no give are likely where studs are present. For precise measurements, using a tape measure from a known stud can help locate others, as studs are generally spaced 16 inches apart, a standard noted on many tape measures. This method ensures that once a stud is identified, additional studs can be found by measuring multiples of 16 inches across the paneling.
Safety Tips and Precautions
Avoiding Wires and Pipes
When undertaking any drilling into walls, the risk of hitting wires or pipes is a significant safety concern. To mitigate these risks, individuals should follow several precautions:
- Use of Stud Finders with Wire Detection: While stud finders equipped with wire-sensing technology provide a helpful first line of defense, they should not be solely relied upon. Verification using additional methods is recommended to ensure safety.
- Visual Inspection and Planning: Before drilling, inspect both sides of the wall for any visible signs of wires or outlets. If outlets, switches, or fixtures are present, there is a higher likelihood of adjacent wires or pipes.
- Prescribed Cable Zones: Familiarize oneself with common cable zones, such as within 150 millimeters from the top of the wall or near corners where walls meet. These areas are more likely to contain hidden wires.
- Exploratory Measures: If uncertainty persists, use a non-conductive instrument to probe the area gently. Tools like insulated screwdrivers or stiff wires can help detect obstructions without causing damage.
- Professional Consultation: In complex scenarios, such as walls with multiple utilities installed, consulting a professional can prevent costly and dangerous mistakes.
Proper Drilling Techniques
Proper drilling techniques not only enhance the effectiveness of wall installations but also prevent accidents and wall damage:
- Correct Drill Bit and Screw Length: Ensure that the drill bit and screws used are appropriate for the task. Screws should not penetrate more than 1.5 inches into the wall to avoid reaching wires or pipes that may be embedded deeper within the stud.
- Nail Plates and Protective Measures: When wires or pipes are close to the surface, use nail plates to protect them. These steel plates prevent longer screws or drills from damaging underlying utilities.
- Controlled Drilling: Start with a small drill bit to create a pilot hole, which can help detect resistance from unexpected obstacles like pipes or cross blocking.
- Monitoring and Adjustment: Continuously monitor the drilling process. If resistance is felt or if the drill does not penetrate smoothly, stop immediately to reassess and avoid potential damage.
By adhering to these safety tips and proper drilling techniques, individuals can significantly reduce the risks associated with installing wall hangings, shelves, or other fixtures. These precautions ensure that the structural integrity of the wall is maintained while safeguarding against potential hazards.
Conclusion
Throughout this comprehensive guide, we’ve explored various effective methods to locate wall studs, ensuring readers are well-prepared for any home improvement project that requires secure mounting or hanging. From the simplicity of tapping on the wall to the precision offered by modern stud finders, the discussed techniques cater to both the traditional DIY enthusiast and those inclined towards utilizing technology. Importantly, the significance of finding wall studs extends beyond mere convenience—it is a vital practice for maintaining the structural integrity of your homes and ensuring the safety of wall-mounted fixtures.
In closing, remember that mastering the skill of locating studs is crucial for anyone looking to undertake home renovations, installations, or decorations. Whether you’re dealing with drywall, plaster, or wood paneling, the ability to accurately find studs not only enhances the stability and safety of your projects but also prevents potential damage. The insights provided here aim to empower you to approach your next project with confidence, equipped with the knowledge to successfully navigate the challenges of finding wall studs in various settings.